
-
Cable Internet
-
Dial-Up
-
Digital Telephone
-
DSL
-
Email Protection
-
Fibre Internet
-
My Account
-
Nexicom Email
- Adding a contact to your contact list (Webmail)
- Attaching a File Using the Webmail
- Check Multiple Nexicom Email Accounts with One Login
- Email Setup in Incredimail
- Email Setup in Mac Mail
- Email Setup in Mail for Windows 10
- Email Setup in Mozilla Thunderbird
- Email Setup in Outlook (Office 365)
- Email Setup in Outlook 2003
- Email Setup in Outlook 2007
- Email Setup in Outlook 2010
- Email setup in Outlook 2013
- Email Setup in Outlook Express
- Email Setup in Windows Live Mail
- Email Setup in Windows Mail
- Email Setup on Android Phone or Tablet
- Email Setup on iPad (iOS7)
- Email Setup on iPad (Pre-iOS7)
- Email Setup on iPhone/iPod Touch (iOS 7+)
- Email Setup on iPhone/iPod Touch (Pre-iOS7)
- Important information for using email outside Canada!
- Logging in to the Nexicom Webmail
- Setting up an Auto-Responder
- Setting up Email Forwarding
- Show all articles (9) Collapse Articles
-
Nexicom Routers
-
NexiPhone (Landline)
-
Security
-
TV
-
Web Hosting
- A Web Hosting and Domain Registration Self Serve Guide
- Backup your website
- Deleting Mail From Webmail
- Exceeding Resource Limits
- Getting Free SSL/TLS Certificate from Let's Encrypt
- Hosting Email Setup
- Hosting Email Setup In Thunderbird
- Hosting Email Setup on Android Phone or Tablet
- Hosting Email Setup on iPhone or iPad
- How to create a subdomain
- Login to your Web Hosting Control Panel (Plesk)
- Manage Whitelist and Blacklist
- Updating your DNS record
- Website is showing a default webpage
-
Wireless Internet
Hosting Email Setup on Android Phone or Tablet
POP 3 Instructions
These instructions apply to most Samsung Android Phones or Tablets. It should also be similar to other Email applications on other Android Devices.
1. Tap the Email app.

2. Tap the hamburger menu icon.

3. Tap the Email Settings icon (looks like a cog wheel).

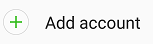
4. Tap “Add account”.
5. Tap ADD NEW ACCOUNT button.
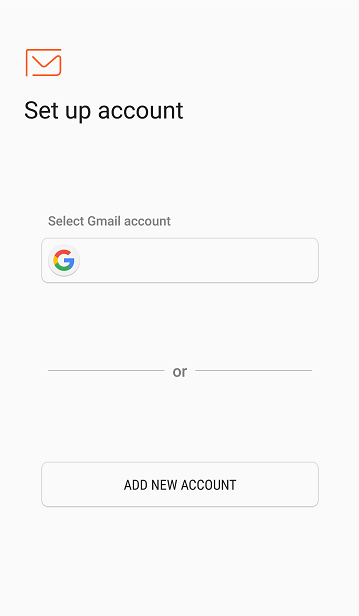
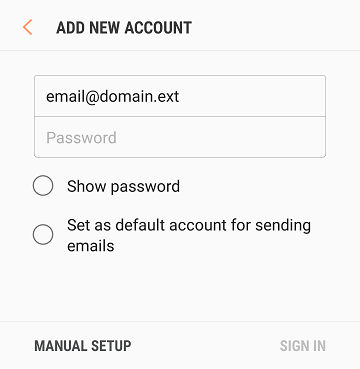
6. Type in the email address and password and then tap “MANUAL SETUP“.
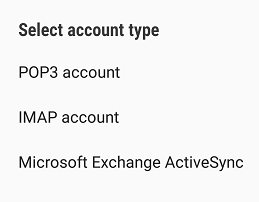
7. Select POP3 account type.
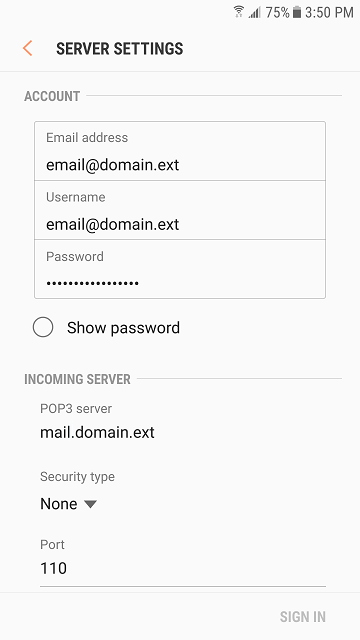
8. Type in your own Email address, your Username (your full email address), and your Password.
Enter the POP3 server of your domain in the format of: mail.domain.ext, Security type should be None, and the Port should be 110.
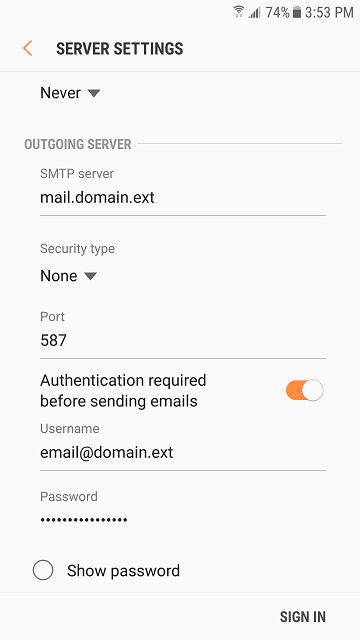
9. Type in the SMTP server in the format of: mail.domain.ext, Security type is: None, and Port: 587.
Authentication required before sending emails should be On.
Enter your Username (your full email address), and enter your Email Password
10. Tap SIGN IN.