-
Cable Internet
-
Cable TV
-
Dial-Up
-
Digital Telephone
- Calix 844E Digital Phone Adapter Setup Guide
- Connection Setup (Tilgin 452/453W)
- Connection Setup for DHCP (Tilgin 322)
- Connection Setup for DHCP (Tilgin HG1311/1351)
- Connection Setup for DHCP (Tilgin HG2301)
- Connection Setup for PPPoE (Tilgin 322)
- Connection Setup for PPPoE (Tilgin HG1311/1351)
- Connection Setup for PPPoE (Tilgin HG2301)
-
DSL
- Comtrend NexusLink 3120 Wireless Gateway Setup
- Connection Setup on a Comtrend AR-5381u modem
- Connection Setup on a D-Link Router
- Connection Setup on a Linksys Smart Wifi Router
- Connection Setup on a ZyXEL P-660HN-51 modem
- Connection Setup on Linksys Router
- Connection Setup on Mac OSX
- Connection Setup on Windows 7
- Connection Setup on Windows 8
- Connection Setup on Windows Vista
- Connection Setup on Windows XP
-
Email Protection
-
Fibre Internet
-
Nexicom Email
- Adding a contact to your contact list (Webmail)
- Attaching a File Using the Webmail
- Email Setup in Incredimail
- Email Setup in Mac Mail
- Email Setup in Mail for Windows 10
- Email Setup in Mozilla Thunderbird
- Email Setup in Outlook (Office 365)
- Email Setup in Outlook 2003
- Email Setup in Outlook 2007
- Email Setup in Outlook 2010
- Email setup in Outlook 2013
- Email Setup in Outlook Express
- Email Setup in Windows Live Mail
- Email Setup in Windows Mail
- Email Setup on Android Phone or Tablet
- Email Setup on iPad (iOS7)
- Email Setup on iPad (Pre-iOS7)
- Email Setup on iPhone/iPod Touch (iOS 7+)
- Email Setup on iPhone/iPod Touch (Pre-iOS7)
- Important information for using email outside Canada!
- Logging in to the Nexicom Webmail
- Setting up an Auto-Responder
- Setting up Email Forwarding
- Show all articles ( 8 ) Collapse Articles
-
Nexicom Routers
-
NexiPhone (Landline)
-
Security
-
Web Hosting
-
Wireless Internet
Email Setup on Android Phone or Tablet
These instructions apply to most Samsung Android Phones or Tablets. It should also be similar to other Email applications on other Android Devices.
1. Click on the Email App in your list of Applications
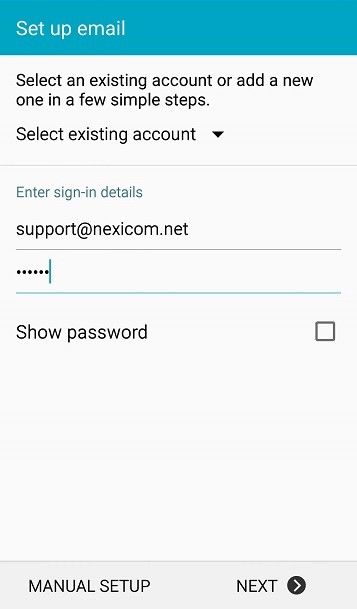
2. Type in your email address and password and then click MANUAL SETUP.
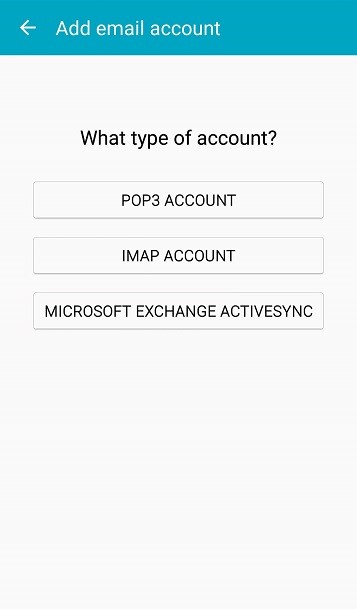
3. Click on POP3 ACCOUNT.
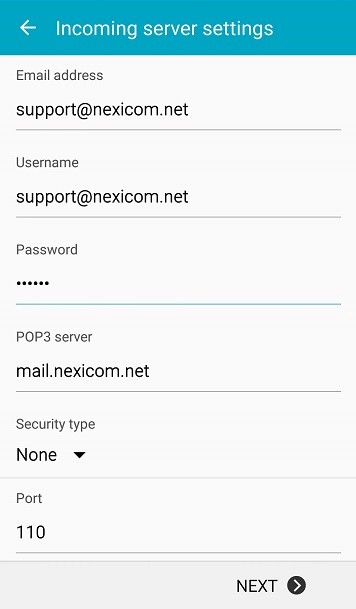
4.Type in your own email address, your username (your full email address), and your password. Enter the POP3 server: mail.nexicom.net, Security type should be None, and the Port should be 110. Click NEXT.
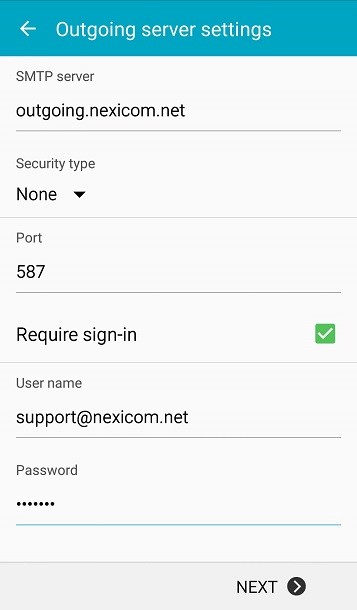
5. Type in the SMTP server: outgoing.nexicom.net, Security type is: None, and Port: 587. Require sign-in should be checked. Enter your Username as your own full email address, and enter your Email Password. Click NEXT.
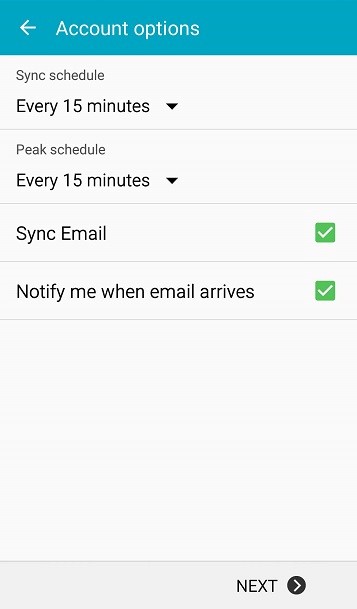
6. Set the Account options to your personal preference and click NEXT.
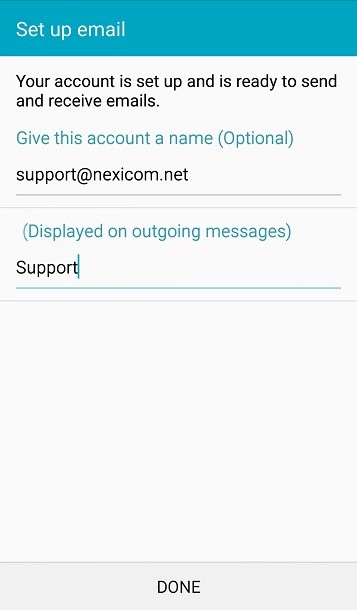
7. The name can be anything you like, and Displayed on outgoing messages can be anything you like. Most people put their first and/or last names. Click Done.
8. Once you click Done, you will see your Inbox, and any messages you have waiting in your account will download and be listed.