-
Cable Internet
-
Dial-Up
-
Digital Telephone
-
DSL
-
Email Protection
-
Fibre Internet
-
My Account
-
Nexicom Email
- Adding a contact to your contact list (Webmail)
- Attaching a File Using the Webmail
- Check Multiple Nexicom Email Accounts with One Login
- Email Setup in Incredimail
- Email Setup in Mac Mail
- Email Setup in Mail for Windows 10
- Email Setup in Mozilla Thunderbird
- Email Setup in Outlook (Office 365)
- Email Setup in Outlook 2003
- Email Setup in Outlook 2007
- Email Setup in Outlook 2010
- Email setup in Outlook 2013
- Email Setup in Outlook Express
- Email Setup in Windows Live Mail
- Email Setup in Windows Mail
- Email Setup on Android Phone or Tablet
- Email Setup on iPad (iOS7)
- Email Setup on iPad (Pre-iOS7)
- Email Setup on iPhone/iPod Touch (iOS 7+)
- Email Setup on iPhone/iPod Touch (Pre-iOS7)
- Important information for using email outside Canada!
- Logging in to the Nexicom Webmail
- Setting up an Auto-Responder
- Setting up Email Forwarding
- Show all articles (9) Collapse Articles
-
Nexicom Routers
-
NexiPhone (Landline)
-
Security
-
TV
-
Web Hosting
- A Web Hosting and Domain Registration Self Serve Guide
- Backup your website
- Deleting Mail From Webmail
- Exceeding Resource Limits
- Getting Free SSL/TLS Certificate from Let's Encrypt
- Hosting Email Setup
- Hosting Email Setup In Thunderbird
- Hosting Email Setup on Android Phone or Tablet
- Hosting Email Setup on iPhone or iPad
- How to create a subdomain
- Login to your Web Hosting Control Panel (Plesk)
- Manage Whitelist and Blacklist
- Updating your DNS record
- Website is showing a default webpage
-
Wireless Internet
Connection Setup on Linksys Router
Note: Before proceeding with this setup, ensure your Nexicom equipment is connected to the Internet or WAN port on your Linksys router via an Ethernet cord. Also ensure that your computer is connected to your Linksys router (preferably by an Ethernet cord).
1. Open your Internet browser.
Note: Internet Explorer was used for the purposes of this instructional document but any web browser will work (Mozilla Firefox, Google Chrome, Safari, etc.)
2. In the address bar, type 192.168.1.1 and press Enter.
Note: 192.168.1.1 is the most common address for Linksys routers, if this does not work consult your router documentation to find the proper address.
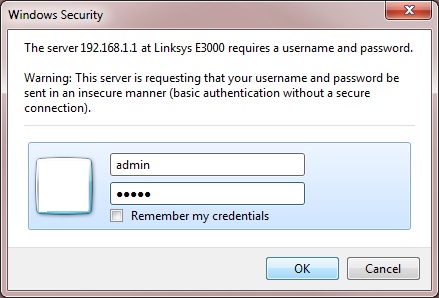
3. Type admin in both the username and the password boxes. Click OK.
Note: This is the default information for most Linksys routers, if this information does not work please consult your router documentation to find the proper information.
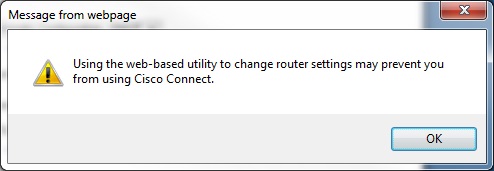
4. You may get a pop up window similar to the one above. If so, click the OK button.
If you don’t see a pop up window like this, move on to the next step.
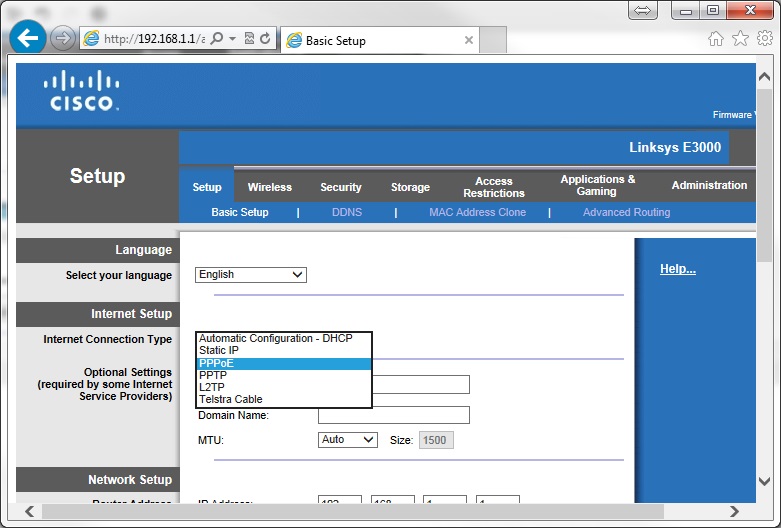
5. Select PPPoE from the drop down box labeled Internet Connection Type.
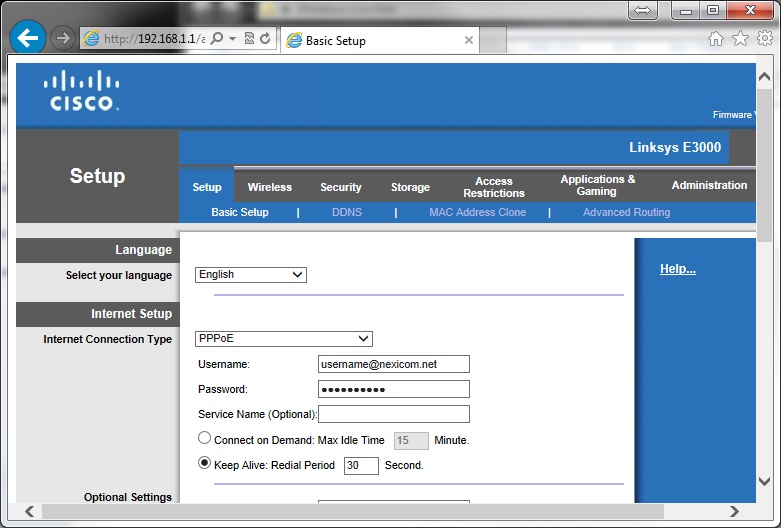
6. Fill in the fields with the corresponding information:
- Username – Your full Nexicom username (This must include @nexicom.net)
- Password – Your Nexicom password
7. Scroll to the bottom of the screen and click on the Save Settings button.
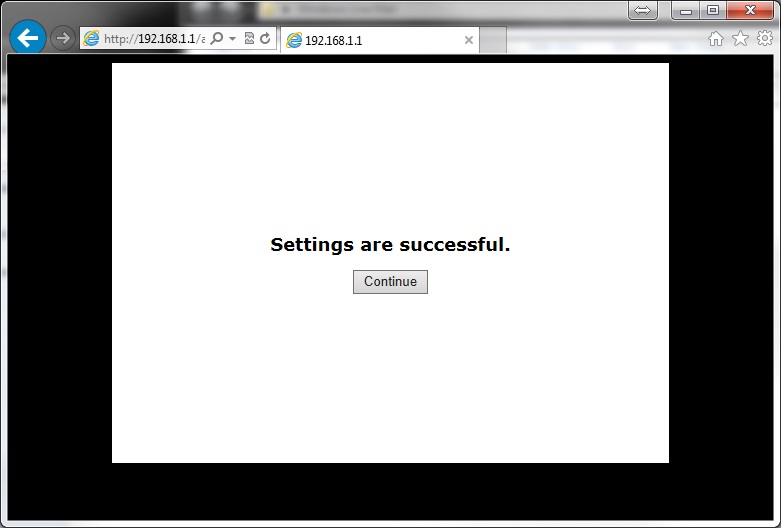
8. You will now see a window that says Settings are successful. Your connection information has now been successfully entered into your Linksys router.
Note: The above walkthrough is for a basic Internet connection setup on a Linksys router. This will not set up or secure your wireless connection. The screens above may differ from the screens you see depending on the model of Linksys router you have. If you have any difficulty in this setup or require assistance in setting up or securing your wireless connection, consult your router documentation and/or contact the manufacturer.


